Have you ever found yourself struggling with a spreadsheet that’s acting up because of links to other files? These external connections in your Microsoft Excel document can cause various issues—from errors and slow performance to problems with sharing or updating your file.
Well, you’re not alone in facing this challenge. Many professionals encounter this problem and look for reliable solutions to manage and eliminate these unwanted links.
Our article will walk you through finding these links—whether they hide in cells, named ranges, or even charts—and show you effective ways to break them safely. From using simple Find and Replace techniques to delving into more advanced options like Edit Links or employing VBA scripts for the tech-savvy users among us, we’ve got it all covered.
Ready for a smoother Excel experience? Keep reading!
Key Takeaways
- You can find external links in Excel through the Find and Replace feature, Edit Links option, or using Name Manager for named ranges.
- Breaking a link in Excel turns formulas that use data from other files into static values. This process is irreversible, so choose carefully which links to break.
- VBA macros offer a powerful way to manage external links in Excel by finding and listing all connections then allowing you to remove them effectively.
- Dynamic arrays and Excel 4.0 macros can help uncover hidden links even in charts or conditional formatting rules, offering another layer of control over your data management.
- Changing security settings for external content lets you decide whether Excel updates these links automatically or prompts you first, increasing both control and protection over your spreadsheets.
Understanding External Links or References in Excel

External links in Excel are like bridges between workbooks. They let formulas in one spreadsheet use data from another. This can make your work powerful and efficient, saving you the trouble of copying and pasting information.
Yet, these links can also cause problems if the other workbook changes or isn’t available anymore. Think of it as a team project – when one person misses a meeting, everyone else needs to adjust.
Finding and managing these external connections is key to keeping your spreadsheets accurate and up-to-date. Imagine trying to bake a cake but some ingredients are stored in your neighbor’s kitchen.
You’ll need access every time you bake! Similarly, Excel needs access to external workbooks for its formulas to work correctly.
Managing external links is like maintaining bridges – essential for smooth travel between destinations.
How to Identify External Links in Excel
Spotting external links in your Excel sheets is key to keeping them clean and functional. You can use various methods, like Find and Replace or the Edit Links feature, to track these down quickly.
Whether you’re working with data ranges, objects like shapes or buttons, charts, or Pivot Tables — knowing where these hidden connections lie ensures your document stays reliable and error-free.
Keep an eye out for unexpected sources of links; even things as simple as object names might be pulling data from elsewhere!
Using Find and Replace
Breaking links in Excel can seem like a tricky task, but it’s crucial for keeping your spreadsheets clean and efficient. The “Find and Replace” feature is a simple yet powerful tool to help you locate these external connections. Here’s how you can use it effectively:
- Open your spreadsheet in Excel. You want to make sure you’re working with the most current version of your document.
- Press Ctrl + F on your keyboard to bring up the ‘Find and Replace’ dialog box. This shortcut saves time.
- In the ‘Find what’ box, type in common file extensions such as .xlsx, .xls, .xlsm, or .xlb. These are the types of files you might be linked to.
- Click ‘Find All’. Excel will now search your entire workbook for these extensions.
- Review the list of found items. This list shows everywhere Excel found external links in your document.
- For each link, decide if you want to keep it or remove it. You have control over which connections stay.
- To break a link, replace the file extension with nothing – just leave it blank and press “Replace”. This step cuts off the tie to the external document.

Taking these steps allows you to clean up unwanted or outdated links from your spreadsheets swiftly.
Moving on, let’s explore how the Edit Links option can further manage these external connections…
Using the Edit Links Option
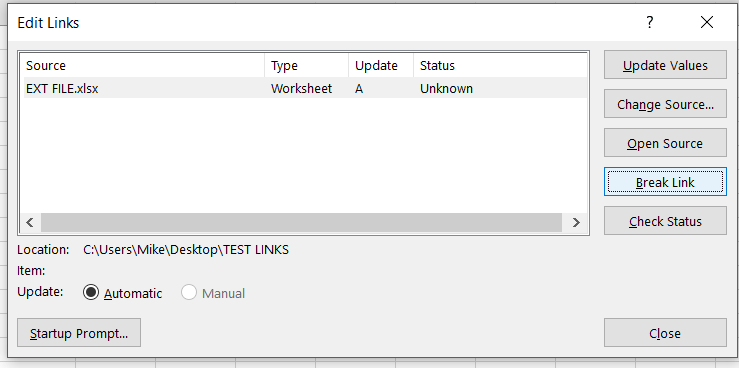
Breaking external links in Excel is a skill every user should master. It helps keep your spreadsheets clean and secure from unwanted changes. Here’s how you can use the Edit Links option to find and manage these links:
- Open your Excel workbook – Start by opening the spreadsheet where you think external links exist.
- Go to the Data tab – Find this tab at the top menu of Excel. It’s where data tools live.
- Click on Edit Links – You’ll see this button within the Connections group of options. If your document doesn’t have any external links, this option will be greyed out.
- View the list of external sources – A new window will pop up showing all external files your document is linked to.
- Check each link – You’ll see details like the source file name and its status (e.g., OK, Unknown, Error).
- Decide on an action – For each link, you can choose to update it, open the source file, break the link, or change its source.
- Break a link if needed – Selecting “Break Link” will convert formulas that use data from other files into static values. Do this with caution as it cannot be undone.
This option gives you control over external references without digging through each cell manually.
Understanding these steps allows users to easily manage their connections to other workbooks—enhancing both security and efficiency in their work with spreadsheets.
Next, let’s explore finding links in Excel named ranges for even deeper control over your data management tasks.
Finding Links in Excel Named Ranges
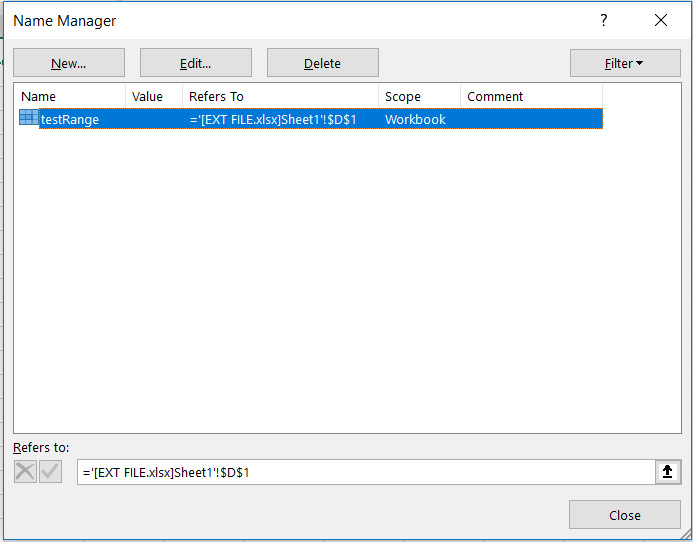
Excel makes managing data easy, but sometimes links to external sources can sneak into named ranges. These hidden links might cause errors or slow down your worksheet. Here’s how you can find and clean them out.
- Open the Name Manager — You’ll find this tool in the Formulas tab. It lists all named areas in your worksheet.
- Look through the “Refers To” column — This shows where each name gets its data. Keep an eye out for any web addresses or file paths that point outside your current workbook.
- Search for unusual formulas — Sometimes, a link isn’t obvious. If a named range uses an odd formula, it might be pulling data from another file.
- Update or delete as needed — You can either change the formula so it doesn’t link elsewhere or remove the named range if you don’t need it.
Next up, we’ll explore identifying links in Excel objects…
Identifying Links in Excel Objects
Finding links in Excel shapes, charts, or drawings can be tricky. Objects like these often hide external references that are tough to spot. Here are clear steps to help you uncover and manage them:
- Open your Excel file and go to the “Home” tab.
- Click on “Find & Select” in the right corner of the ribbon.
- Choose “Go To Special” from the list that appears.
- Select “Objects” and click “OK”. Excel will now highlight every object in the worksheet.
- Review each highlighted item by right – clicking on it and choosing “Edit Text” or “Format Object”, depending on the type of object.
- Look for any text or formulas that include references to other files or data sources outside of your current workbook.
- For charts, enter into their editing mode by double-clicking them, then review their data series values for external links.
- Pivot tables need a bit more attention—right – click on the pivot table, select “PivotTable Options“, then go over to the “Data” tab to check if there’s any link under “Save source data with file” that points outwards.
This method ensures you don’t miss hidden links lurking in places you might not think to look at first glance. By following these steps, you gain control over all types of content within your sheets, securing your data management process against unwanted external interferences.
Discovering Links in Excel Charts and Pivot Tables
Uncovering links in Excel Charts and Pivot Tables can sometimes feel like a treasure hunt. It’s important to know where to look.
- Examine Pivot Table connections. Click on your Pivot Table, then analyze the PivotTable Analyze tab. Look for “Change Data Source” to identify any external links.
- Look at chart series formulas. Click on a chart element and check the formula bar. If you see a file path, that means there’s an external link.
- Explore the PivotTable fields list for strange source names that don’t match any table within your current workbook. These could be clues pointing to external files.
- Use the “Connection Properties” option under the “Data” tab for more details about where your Pivot Tables are getting their information.

Each step provides critical insights into where external data might hide within your visual representations in Excel. With this knowledge, users can make informed decisions about how to manage these connections effectively.
Moving on, let’s explore managing external links in Excel…
Managing External Links in Excel
Handling external links in Excel keeps your files clean and safe. You get to decide if these links update automatically or if Excel should ask you first. This gives you control and protects your document from unexpected changes.
Enabling Links to External Workbooks
To work with links to other workbooks, go to the File tab and click Options. Then, look for the Trust Center and choose Trust Center Settings. Here, you’ll see External Content where you can allow your workbook to update all links automatically.
This setting helps keep your data fresh by pulling in the latest information from outside sources.
Mastering Excel means staying on top of settings that make life easier.
By navigating these options wisely, you empower Excel to do its job more effectively—keeping your spreadsheets connected and current without manual updates every time. Make sure to adjust these settings right away for a smoother workflow with external data sources like financial reports or market analyses.
Controlling the Security Prompt for Updating Links
After you’ve made sure links to other workbooks are enabled, it’s crucial to manage how Excel warns you about these links. Excel has a built-in warning system that alerts you before updating content from outside sources.
This step is vital for keeping your data safe. Unknown files might harm your computer or data, so these warnings should not be ignored.
You can adjust how and when Excel gives these security prompts in the Trust Center settings. Go here if you want more control over external content updates. Choose carefully between allowing all updates without any prompt—which might be riskier—or selecting to get warned every time an update is about to happen.
This choice helps protect your files while still letting you use information from trusted external workbooks effectively.
Changing Security Settings for External Links
To adjust security settings for links to external sources in your workbooks, head over to the Trust Center. You can find this under the File tab. Here, you have options to manage how Excel interacts with these external connections.
It’s key for keeping your spreadsheets safe and ensuring that only trusted data flows into your documents.
You also get to decide whether or not Excel warns you before updating links from outside sources. This gives you control over what information gets pulled into your spreadsheets. Making these adjustments helps prevent unwanted changes and keeps your data secure while still allowing necessary updates from sources you trust.
Breaking and Removing External Links in Excel
Learning how to break and remove these connections in Excel will clean up your sheets and keep them running smoothly. Get ready to take control of your data today by learning more!
Traditional Approach
Breaking external links in Excel is a vital skill for cleaning up your files. It ensures your data stays accurate and secure. Here’s how you can do it using the traditional method:
- Open your Excel file and go to the Data tab.
- Click on the Edit Links button found in the Queries & Connections group.
- A new window will pop up, listing all external links in your workbook.
- Select the link you want to break. You might see links to other spreadsheets, databases, or documents here.
- After choosing the link, click on the Break Link button.
- Excel will ask you to confirm because once you break a link, you cannot undo this action.
- Confirm your choice by clicking Break Links.
Keep these steps in mind:
- Using `*.XL` as a wildcard covers all types of Excel files when searching for them.
- Always double – check which links you are breaking because this action is permanent.
These steps will help you maintain clean and reliable workbooks free from unnecessary external references.
Now, let’s look into dynamic arrays and how they offer another way to manage links more efficiently…
Using Dynamic Arrays and Excel 4.0 Macros
Moving past the traditional approach, let’s explore how dynamic arrays and Excel 4.0 macros offer a fresh path for handling external links in your spreadsheets. Bob Ulmas sheds light on this technique to find all source file locations with ease.
- Start with opening your Excel workbook where you need to break links.
- Head to the “Formulas” tab and click on “Name Manager.” Here, you’ll dive into exploring named ranges which might hide external links.
- Use dynamic arrays to sift through data quicker than before. Type a formula that searches across your whole sheet for external references.
- Create an Excel 4.0 macro that digs deeper into your spreadsheet, finding hidden links even in places you might overlook, like charts or conditional formatting rules.
- This macro can list down all the external links it finds onto a new sheet, giving you a clear view of what needs attention.
- After identifying these links, go back to the “Data” tab and select “Edit Links.” Here you can see options to break or change these identified links as needed.
- Keep in mind, some actions like breaking links are permanent and can’t be undone easily. Double-check before making any changes.
This method leverages newer features of Excel like dynamic arrays and the somewhat old but powerful Excel 4.0 macros to streamline what could otherwise be a tedious process of link management in large workbooks. Each step brings you closer to having a clean and efficient spreadsheet without unnecessary dependencies on external sources.
Using VBA Macros
Using Visual Basic for Applications, or VBA macros in Excel, lets you manage external links efficiently. This powerful feature can break or remove unwanted links from your workbook. Here’s how to do it:
- Open your Excel workbook.
- Press Alt + F11 to launch the VBA Editor.
- In the Project Explorer area, right – click and select “Insert,” then “Module.” This action creates a new module.
- Copy and paste the provided VBA code into this new module. The code lists all external connections in your document.
- Run the macro by pressing “ALT + F8” or selecting “Run” from the toolbar.
- A new worksheet named “All Links report” appears in your Excel file. Check Column B for hyperlinks directing you to cells containing external references.
- Examine each link found by the macro carefully. Decide if you want to keep or eliminate each one.
- To break a link, return to your original worksheet and select the cell highlighted by the report.
- Right – click on the cell, choose “Edit Links,” then find and select the link you wish to remove.
- Click “Break Link” to sever the connection between your file and the external source.
Sub Get_Links()
    Dim links As Variant
    Dim i As Integer

    ' Get all external links from the active workbook
    links = ActiveWorkbook.LinkSources(xlExcelLinks)

    ' Check if any links were found
    If Not IsEmpty(links) Then
        ' Add a new worksheet at the end
        Sheets.Add After:=Sheets(Sheets.Count)

        ' List all links in the new worksheet starting from the first cell
        For i = 1 To UBound(links)
            Cells(i, 1).Value = links(i)
        Next i
    Else
        ' Display a message box if no external links are found
        MsgBox "No external links are found.", vbInformation, "Find Links"
    End If
End Sub
This method ensures that you have full control over which links stay and which ones go, protecting your document from unintended changes or updates from outside sources. Follow these steps, and you’ll clean up any workbook with ease!
How to Find and Fix Broken Links in Excel
Fixing broken links in Excel is crucial for keeping your data connected and up-to-date. Luckily, the “Edit Links” feature makes this task simple. Here’s how to use it effectively:
- Open your Excel document. This document might contain charts, formulas, or tables that rely on data from other files.
- Go to the “Data” tab at the top of your screen. Here you’ll find various tools to manage your spreadsheet’s data.
- Click on “Edit Links.” This button is in the Connections group and helps you view all external references—like documents or websites—your file is linked to.
- A new window pops up showing a list of all linked external sources. These could be presentations, text files, or other spreadsheets.
- Look through the list for any sources marked as “Error” or “Unknown.” These labels indicate a broken link.
- Select a problematic link and then click on “Update Values.” If you know where the new source file is, this action will re-establish the connection.
- If updating doesn’t work, choose “Change Source.” Navigate to where the correct file now lives.
- For e-mails or hyperlinks that lead to websites, ensure they’re correctly typed in the cell. A misspelled email address or website link won’t work.
- Check that any emails intended as hyperlinks include ‘mailto: ‘ before the email address without any spaces. This format prompts Excel to open your default mail software when clicked.
- In cases where your hyperlink should direct someone to a specific file on their computer or network, confirm that you’ve included the full path of the file’s location—and it’s correct.
- Sometimes, links break because of changes in file extension names—like switching from .xls to .xlsx, or if documents move into different folders after updates like unzipping files or cleaning out directories.
- Utilize tools within Microsoft Office 365 and other text editors for checking links en masse when dealing with large spreadsheets that have numerous connections.
- Make sure protected view settings aren’t blocking content from being displayed properly—if a link leads to a downloaded document, sometimes enabling editing will fix non-functioning hyperlinks.
Using these steps ensures that all important connections in your Excel file are active and correct. This way, your data always stays reliable and fresh—helping you avoid errors and make better decisions based on accurate information.
Troubleshooting Excel Hyperlinks Not Working
Hyperlinks can stop working in Excel, leaving you scratching your head. Let’s tackle common issues and find solutions to get those links clicking again.
Common issues
Many times, Excel hyperlinks stop working because the source workbook gets deleted, moved, or damaged. This makes links break and show “ERROR: SOURCE NOT FOUND” in the Edit Links dialog box.
Users often face challenges with hyperlinks not functioning properly when they deal with files across multiple locations on Windows or within different Microsoft Excel worksheets.
Fixing broken links requires understanding where your data lives.
Other problems include incorrect file paths or filenames and issues linking to an Outlook email, a webpage using Internet Explorer, or documents inside a zip file. Sometimes, users try linking to an RSS feed in a loop but find that the hyperlink does not work as expected.
These are signs you need to check the path and filename carefully and ensure they are correct and accessible.
Solutions to fix hyperlinks not working
After looking into common issues, it’s clear that fixing hyperlinks not working is the next step. Excel users often face this problem, but there are straightforward ways to solve it.
- Check the hyperlink path: Make sure the web address or file location you’re linking to is correct. Even small mistakes can stop a link from opening.
- Use the ‘Hyperlink’ base function: If you find a broken link, right-click on it, select ‘Edit Hyperlink,’ and then update the destination in the address box.
- Clear web browser cache: Sometimes, your internet browser stores too much data, causing links to fail. Try clearing this saved data to fix the issue.
- Disable add-ins: Some add-ins can interfere with hyperlinks. Go to File > Options > Add-Ins in Excel, and disable them one by one to see if this solves the problem.
- Repair Office installation: If hyperlinks are still not working, repairing your Office program through Control Panel > Programs and Features might help.
- Update Excel: Ensure you have the latest version of Excel installed. Microsoft often releases updates that fix bugs affecting hyperlinks.
- Check for restrictions: Some documents have editing restrictions that prevent hyperlinks from working properly. Review document settings to make adjustments.
By following these steps, most problems with hyperlinks not functioning should be resolved quickly and easily, allowing for a smoother experience in Excel.
Tips to Prevent Broken Hyperlinks in Excel
To keep your hyperlinks in Excel working, always update links if you move or rename your files. Think of it like telling your friends you’ve changed your phone number. They need the new one to reach you.
Also, check your hyperlinks regularly, especially after changes. Use tools like ASAP Utilities for a quick review.
Keep Excel sheets tidy to prevent broken links. This means deleting unused links and keeping track of where each link goes. Organize your spreadsheets so you can easily see what’s linked where.
A clean and organized spreadsheet saves time and headaches later on with fewer hyperlink issues to fix.
Conclusion
We’ve explored various ways to track down and disconnect external ties in Excel, from simple find-and-replace tactics to diving deep into dynamic arrays and macros. This journey equips you with the tools necessary—like the Edit Links feature and VBA code—to ensure your workbooks stand clean of unwanted connections that could pose risks or lead to confusion.
Recognizing the significance of removing these links can’t be overstated; doing so not only safeguards your data but also streamlines your workflow, leading to more reliable outcomes.
For those eager to dive deeper, additional resources await. Whether through exploring Excel’s vast functionalities or seeking online tutorials, knowledge enhancement is within reach.
Remember, mastery over these techniques can transform how you manage spreadsheets in fundamental ways.
Let this guide inspire confidence in managing external references more efficiently. Tackling them head-on will no doubt contribute significantly to your proficiency in spreadsheet management.
So take control today—cleanse those workbooks for a smoother, more dependable Excel experience!


Leave a Comment